Category Archives: OUD

Enterprise User Security – Part 4

Before we start registering databases and creating users and groups in the directory, we must first patch our Oracle 12c database homes. If you followed me since part 1 of this series you already have the necessary binaries to update OPatch and install database patch 19285025. Since I assume most of you are professional DBAs I’m not going into the details of applying the database patch. Unfortunately, the patch read-me does not tell you to re-link the LDAP client binaries which actually is the crucial bit.

cd ${ORACLE_HOME}/ldap/lib
make -f ins_ldap.mk ORACLE_HOME=${ORACLE_HOME} clientonlyinstall

 
Register a database
For the database to be able to communicate with the directory service we must register it with the OUD. The database will be an entity in the directory and is required to authenticate itself as such.

Configure ldap.ora:
This will let the database know where to contact the directory server.

vi ${TNS_ADMIN}/ldap.ora

DIRECTORY_SERVERS=(<OUD_SERVER>:1389:1636)
DIRECTORY_SERVER_TYPE=OID
DEFAULT_ADMIN_CONTEXT="dc=spotonoracle,dc=ch"

Configure sqlnet.ora:
The database will use a wallet to store the credentials used to authenticate itself with the directory service. If the database is already using a wallet for some other feature, you can share it.

mkdir /u01/app/oracle/admin/${ORACLE_SID}/wallet

vi ${TNS_ADMIN}/sqlnet.ora
 
NAMES.DIRECTORY_PATH = (LDAP, TNSNAMES, EZCONNECT)
WALLET_LOCATION =
  (SOURCE =
    (METHOD = FILE)
    (METHOD_DATA =
      (DIRECTORY = /u01/app/oracle/admin/$ORACLE_SID/wallet)
    )
  )

Define how the database will login to OUD:

alter system set ldap_directory_access=password scope=both;

 
Registering the database:
The DBCA (Database Configuration Assistant) is used to register databases with the directory service. The password used by the database for authentication is generated automatically and stored in the wallet. The wallet password is provided by you. If you already have a wallet the DBCA will just add the necessary entry, otherwise it will create a new wallet.

dbca -silent \
  -configureDatabase \
  -sourceDB "${ORACLE_SID}" \
  -registerWithDirService true \
  -dirServiceUserName "cn=diradmin" \
  -dirServicePassword "Complex-1-Password" \
  -walletPassword 'Wallet-1-Password'

You can view the registration password generated by the DBCA:

mkstore -wrl /u01/app/oracle/admin/${ORACLE_SID}/wallet -viewEntry ORACLE.SECURITY.PASSWORD

Verify the dababase is an entity in the directory:

ldapsearch -D "cn=diradmin" -w "Complex-1-Password" -h <OUD_SERVER> -p 1389 -b dc=spotonoracle,dc=ch cn=${ORACLE_SID} -LLL

From now on, as a nice side effect, clients (e.g. SQL*Plus) can use OUD as TNS names resolution service.

Prepare the database EUS user and roles
You’ll most likely going to use shared schemas, so that’s what I’m doing here.
I create a globally identified user. This means, the database will be using the directory service to authenticate client connection request. This user does not get any privileges or roles granted at all.
The newly created global role gets all the privileges and roles that are required for the users in a given functional role.

create user eus_user identified globally;

create role eus_dba_role identified globally;
grant create session to eus_dba_role;
grant dba to eus_dba_role;

 
Prepare directory objects
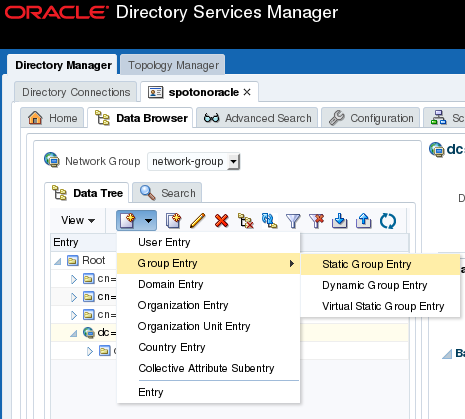
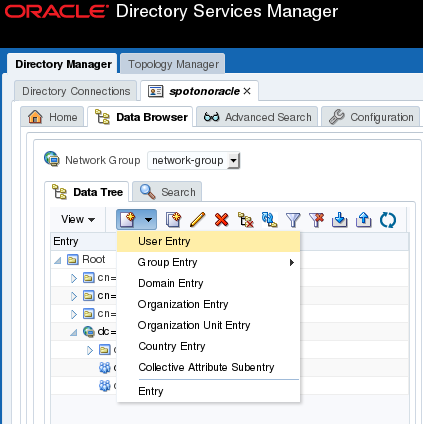
There are certain tasks that are more easily performed in the ODSM web console, e.g. create users and groups. We want to create the following structure in the GUI:
00-target-structure-odsm

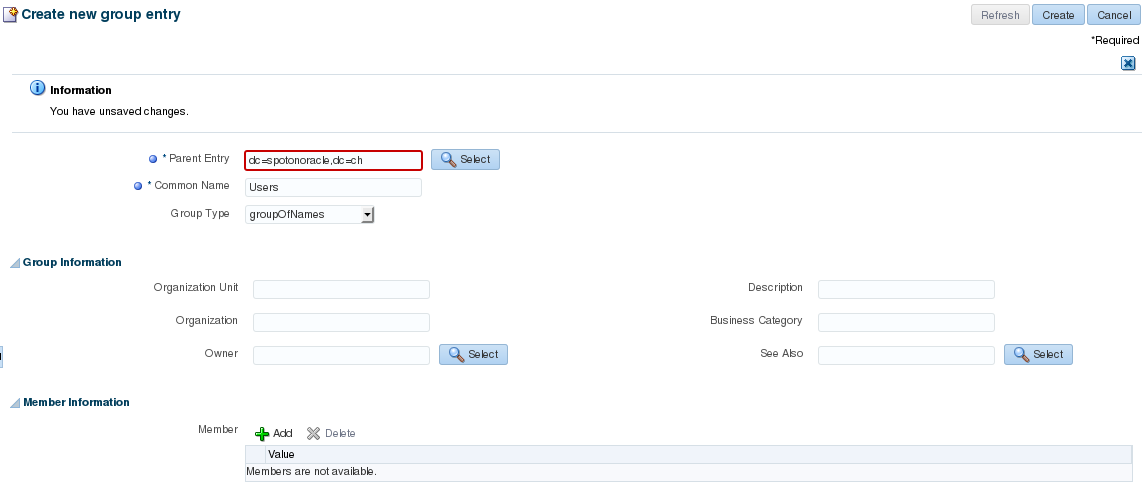
Create a group named “Users” to hold user entities. Navigate to level: “Root” => “dc=spotonoracle,dc=ch” and create a “Static Group Entry”:
01-create-group-menu

In the group details, enter the common name: Users
02-create-users-group

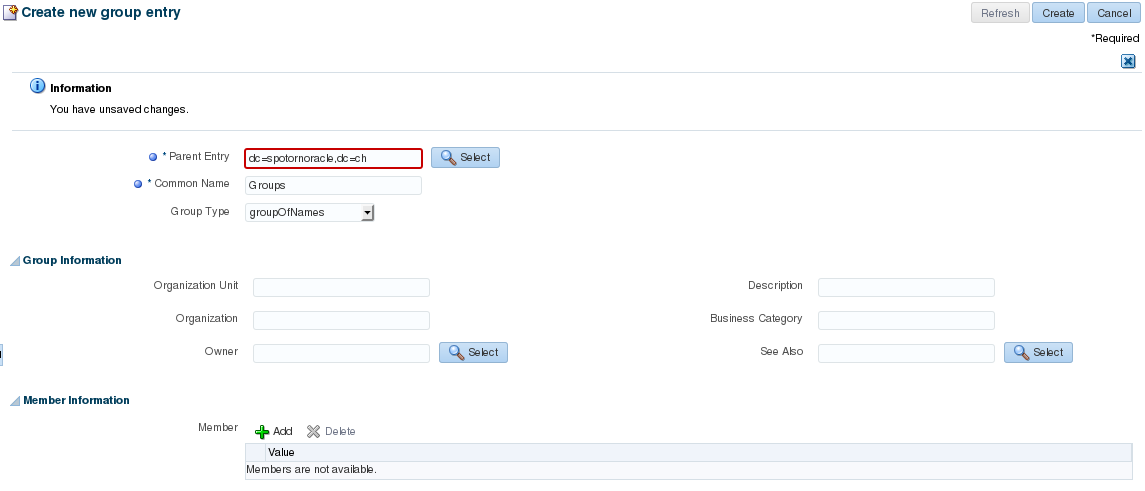
Create another static group named “Groups” on the same level as “Users” (dc=spotonoracle,dc=ch):
03-create-groups-group

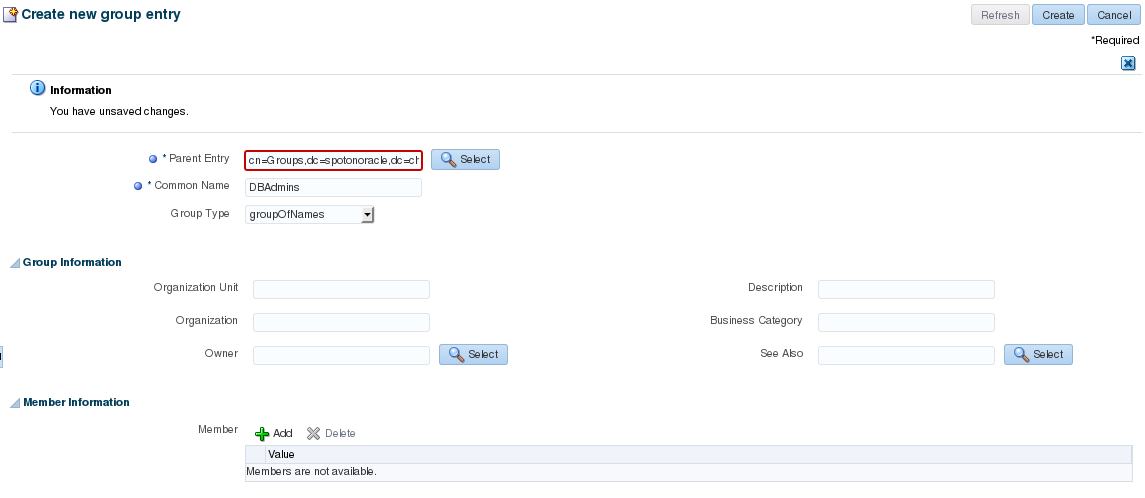
Create a DBA Group named “DBAdmins” under the “Groups” group. In the left tree, navigate to “Groups” and add a new static group “DBAdmins” below:
04-create-dbadmins-group

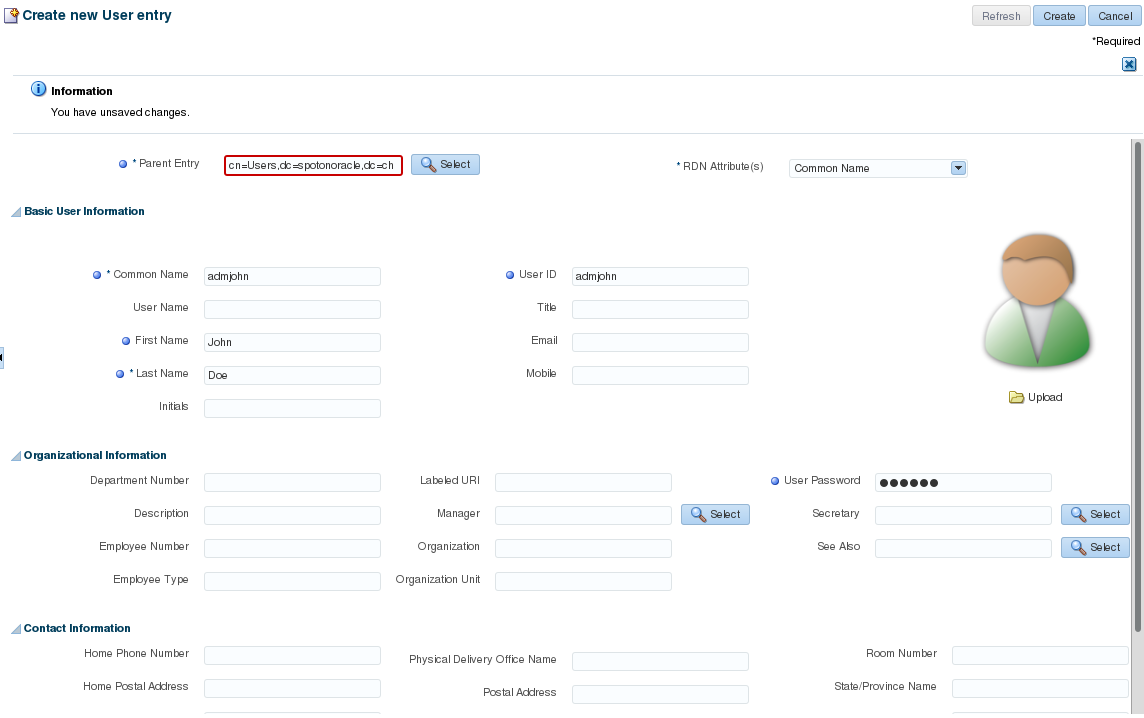
Create a user named “admjohn”. In the left tree, navigate to group “Users” and create a “User Entry”:
05-create-user-menu

Fill in the user’s details. Note, the field “User ID” maps to the user name that will be provided in the database connection string. “User Password” is the password that the end user will provide to authenticate with the database.
06-create-admjohn

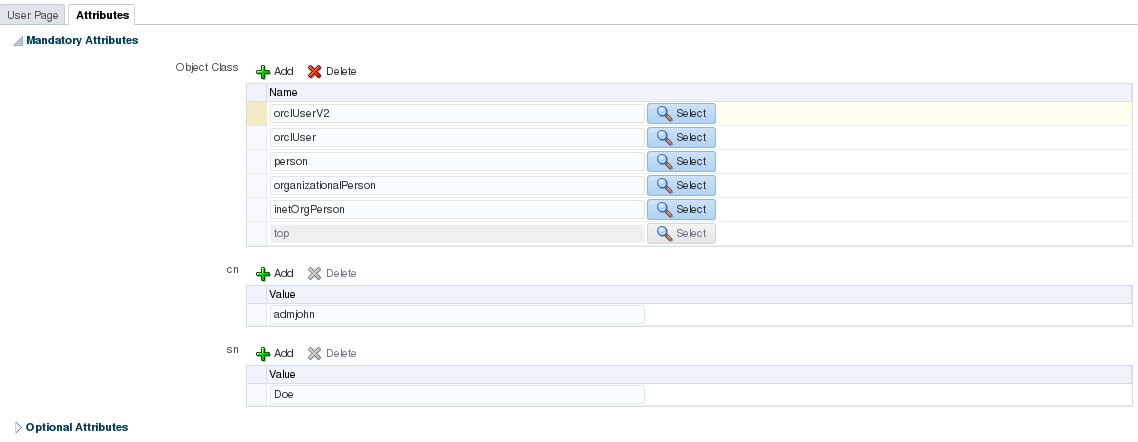
Important: the user object must have some special attributes. This is what makes the user entity a EUS user from a directory services perspective.
In the tree, click on the user and switch to tab “Attributes”. Add following “Object Classes” to the “Mandatory Attributes”:

  • orclUser
  • orclUserV2

07-create-admjohn-attributes

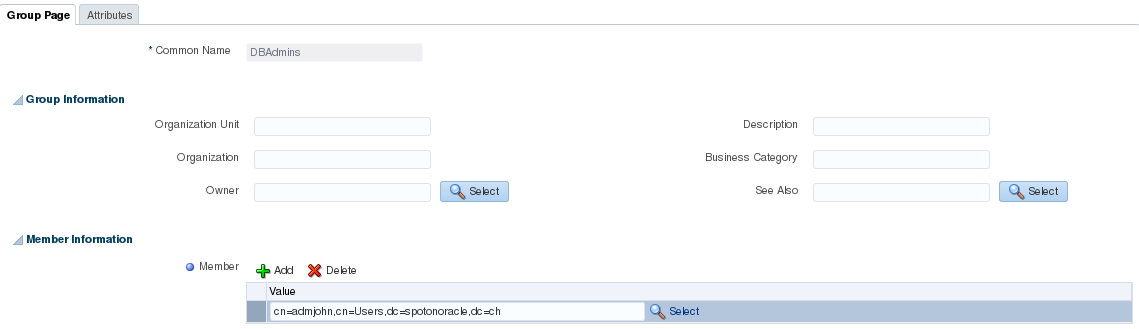
Add user “admjohn” to the “DBAdmins” group. In the tree click on “DBAadmins”, under “Member Information” click “Add” and select “cn=admjohn,cn=Users,dc=spotonoracle,dc=ch”.
08-create-group-membership

OK, let’s get some coffee

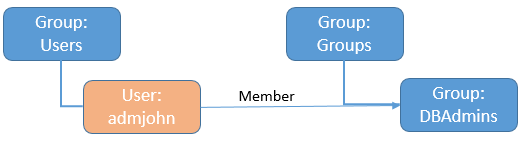
If you’re still with me but lost a little track, we should take another look at the bigger picture I showed in part 1.
eus-relationship
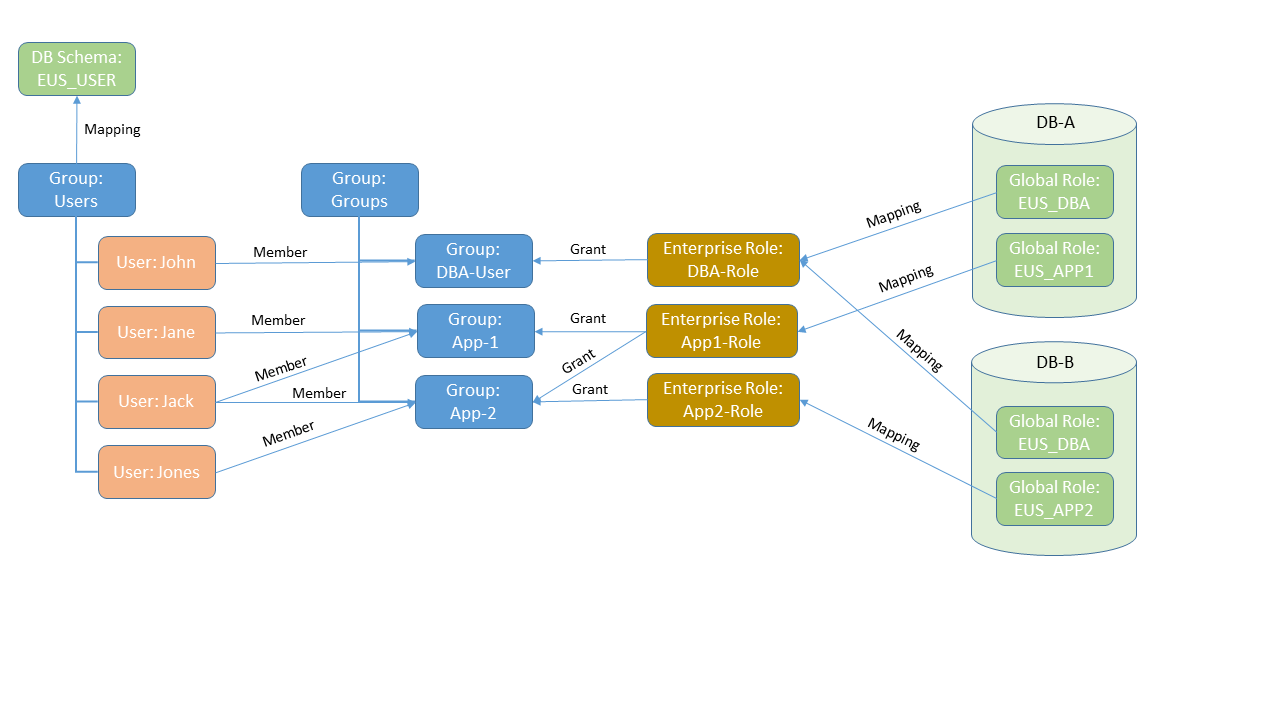
So far we have covered:

  • Green: objects in the database
  • Blue: groups of objects in the LDAP directory
  • Red: user entities in the LDAP directory

What we’re going to do next is:

  • Yellow: enterprise roles in the LDAP directory
  • All the mappings (arrows)
  • All the grants (arrows)

This will be quite a lengthy post but don’t think it makes much sense to break it up in pieces. I will go on…but this time, using the Oracle EUSM utility (it’s documented in MOS note 1085065.1). Alternatively, you can do the same thing in the Enterprise Manager web console (perhaps more comfortable in a GUI). I like the CLI because it’s self-documenting and scriptable.

Create enterprise roles, mappings, and grants

Set default schema for all our enterprise users in the “Users” group. This will create the mapping for the group “Users” to database schema “EUS_USER”, and inherently all users in that group.

eusm createMapping \
  domain_name="OracleDefaultDomain" \
  map_type="SUBTREE" \
  map_dn="cn=Users,dc=spotonoracle,dc=ch" \
  schema="EUS_USER" \
  realm_dn="dc=spotonoracle,dc=ch" \
  ldap_host=<OUD_SERVER> \
  ldap_port=1389 \
  ldap_user_dn="cn=diradmin" \
  ldap_user_password="Complex-1-Password"

Previously, we have created a global role “EUS_DBA_ROLE” in the database. We need a matching role entity in the directory and call the enterprise role “DBARole”.

eusm createRole \
  enterprise_role="DBARole" \
  domain_name="OracleDefaultDomain" \
  realm_dn="dc=spotonoracle,dc=ch" \
  ldap_host=<OUD_SERVER> \
  ldap_port=1389 \
  ldap_user_dn="cn=diradmin" \
  ldap_user_password="Complex-1-Password"

Create a mapping between the enterprise role and the database role. The enterprise role can be mapped to many databases. For your sanity’s sake I don’t recommend to mix and match a lot.
E.g. Map the “DBARole” enterprise role only to the same role (incl. its definition) on multiple database. In this case the database role should be EUS_DBA_ROLE with the exact same grants on all database. Otherwise don’t map it to “DBARole” and create a separate enterprise role.

eusm addGlobalRole \
  enterprise_role="DBARole" \
  domain_name="OracleDefaultDomain" \
  realm_dn="dc=spotonoracle,dc=ch" \
  database_name="${ORACLE_SID}" \
  global_role="EUS_DBA_ROLE" \
  dbuser="system" \
  dbuser_password="<SYSTEM_PASSWORD>" \
  dbconnect_string="<DB_HOST_NAME>:<LISTENER_PORT>/<DB_SERVICE_NAME>" \
  ldap_host=<OUD_SERVER> \
  ldap_port=1389 \
  ldap_user_dn="cn=diradmin" \
  ldap_user_password="Complex-1-Password"

What’s left missing is the grant. We grant the role “DBARole” to the “DBAdmins” group. All the members of the “DBAdmins” group inherit this role grant.

eusm grantRole \
  enterprise_role="DBARole" \
  domain_name="OracleDefaultDomain" \
  realm_dn="dc=spotonoracle,dc=ch" \
  group_dn="cn=DBAdmins,cn=Groups,dc=spotonoracle,dc=ch" \
  ldap_host=<OUD_SERVER> \
  ldap_port=1389 \
  ldap_user_dn="cn=diradmin" \
  ldap_user_password="Complex-1-Password"

 
Voilà

$ sqlplus admjohn/************@<DB_HOST_NAME>:<LISTENER_PORT>/<DB_SERVICE_NAME>
SQL> select * from session_roles;
ROLE
--------------------------------------------------------------------------------
EUS_DBA_ROLE

 
Summary
With the fourth part of this series I conclude the basic setup of OUD, ODSM, and EUS. If I find the time I’m going to show some other aspects of OUD and EUS (directory replication, custom SSL certificates, directory disaster recovery or some more complex EUS setups). We’ll see…
So long, enjoy EUS.

Enterprise User Security – Part 3

Today we’re going to install Oracle Directory Services Manager (ODSM). To run ODSM we need Weblogic with Oracle Application Developer Framework (ADF). Let’s assume we have a JDK installed as shown in the previous part of this series.

Install Weblogic

Create the response file:

vi /tmp/silent_wls.xml

<?xml version="1.0" encoding="UTF-8"?>
<bea-installer> 
  <input-fields>
    <data-value name="BEAHOME" value="/u01/app/oracle/product/mdlw11119" />
    <data-value name="WLS_INSTALL_DIR" value="/u01/app/oracle/product/mdlw11119/wlserver1036" />
    <data-value name="OCP_INSTALL_DIR" value="/u01/app/oracle/product/mdlw11119/coherence1036" />
    <data-value name="COMPONENT_PATHS" value="WebLogic Server/Core Application Server|WebLogic Server/Administration Console|WebLogic Server/Configuration Wizard and Upgrade Framework|WebLogic Server/Web 2.0 HTTP Pub-Sub Server|WebLogic Server/WebLogic JDBC Drivers|WebLogic Server/Third Party JDBC Drivers|WebLogic Server/WebLogic Server Clients|WebLogic Server/WebLogic Web Server Plugins|WebLogic Server/UDDI and Xquery Support" />
    <data-value name="INSTALL_NODE_MANAGER_SERVICE" value="no" />
    <data-value name="NODEMGR_PORT" value="5556" />
    <data-value name="INSTALL_SHORTCUT_IN_ALL_USERS_FOLDER" value="no"/>
    <data-value name="LOCAL_JVMS" value="/usr/java/jdk1.7.0_85"/>
  </input-fields> 
</bea-installer>

Feed the response file to the OUD installer:

mkdir /tmp/tmpwls
unzip V29856-01.zip -d /tmp/tmpwls
cd /tmp/tmpwls

umask 0027 # pre-requisite from the WLS installation guide
java -d64 -Xmx1024m -jar wls1036_generic.jar \
  -mode=silent -silent_xml=/tmp/silent_wls.xml

rm -rf /tmp/tmpwls

 
Install ADF

Create the response file:

ADF will be installed in MW_HOME/oracle_common. If you want to specifiy the directory name add “ORACLE_HOME=/<...>” to the response file.

vi /tmp/silent_adf.rsp

[ENGINE]
Response File Version=1.0.0.0.0
[GENERIC]
SPECIFY_DOWNLOAD_LOCATION=false
SKIP_SOFTWARE_UPDATES=true
SOFTWARE_UPDATES_DOWNLOAD_LOCATION=
MIDDLEWARE_HOME=/u01/app/oracle/product/mdlw11119
APPSERVER_TYPE=WLS

[SYSTEM]
[APPLICATIONS]
[RELATIONSHIPS]

Feed the response file to the OUD installer:

mkdir /tmp/tmpadf
unzip p20996481_111190_Generic.zip -d /tmp/tmpadf
cd /tmp/tmpadf

./Disk1/runInstaller -silent \
  -responseFile /tmp/silent_adf.rsp \
  -jreLoc /usr/java/jdk1.7.0_85

rm -rf /tmp/tmpadf

 
Create the ODSM Weblogic domain

Create the response file (WLST script):

Replace following place holders in the script with your values:
=> password for the “weblogic” user
=> host name of your WLS server

vi /tmp/create_odsm_domain.py

#!/usr/bin/python
import os, sys
readTemplate(r'/u01/app/oracle/product/mdlw11119/wlserver1036/common/templates/domains/wls.jar')
cd(r'/Security/base_domain/User/weblogic')
cmo.setPassword('<WEBLOGIC_PASSWORD>')
cd(r'/Server/AdminServer')
cmo.setName('AdminServer')
cmo.setListenPort(7001) # HTTP port
cmo.setListenAddress('<HOST_NAME>')
setOption('JavaHome', '/usr/java/jdk1.7.0_85')
setOption('ServerStartMode', 'prod')
create('AdminServer','SSL')
cd(r'/Servers/AdminServer/SSL/AdminServer')
cmo.setEnabled(true)
cmo.setListenPort(7002) # HTTPS port
cmo.setHostnameVerificationIgnored(true)
cmo.setHostnameVerifier(None)
cmo.setTwoWaySSLEnabled(false)
cmo.setJSSEEnabled(true)
writeDomain(r'/u01/app/oracle/product/mdlw11119/user_projects/domains/ODSM')
closeTemplate()
exit()

Feed the scritp to WLST:

${MW_HOME}/oracle_common/common/bin/wlst.sh /tmp/create_odsm_domain.py

 
Configure the ODSM Weblogic domain

Create the response file (WLST script):

vi /tmp/configure_odsm_domain.py

#!/usr/bin/python
import os, sys
readDomain('/u01/app/oracle/product/mdlw11119/user_projects/domains/ODSM')
addTemplate(r'/u01/app/oracle/product/mdlw11119/oud11123/common/templates/applications/oracle.odsm_11.1.1.5.0_template.jar')
updateDomain()
closeDomain()
exit()

 
Feed the scritp to WLST:

${MW_HOME}/oracle_common/common/bin/wlst.sh /tmp/configure_odsm_domain.py

 
Start WLS and login to ODSM

cd /u01/app/oracle/product/mdlw11119/user_projects/domains/ODSM/bin

# if the WLS domain is deployed in production mode as we did
#   then export WLS_USER and WLS_PW before calling startWebLogic.sh
export WLS_USER=weblogic
export WLS_PW=Weblogic-1-Password

nohup ./startWebLogic.sh > wls-start.log 2>&1 &

 
Now, you can login to the OUD directory with ODSM: https://hostname:7002/odsm

odsm-login-screen
 
Welcome to ODSM…

Enterprise User Security – Part 2

By now, you should have all the sources ready to start installing.

As OUD is a pure Java application we first install the JDK (run this as the root user).

Install JDK

mkdir /tmp/tmpjava
unzip p13079846_17000_Linux-x86-64.zip -d /tmp/tmpjava

rpm -Uhv /tmp/tmpjava/jdk-7u85-linux-x64.rpm

rm -rf /tmp/tmpjava

As I’m an Oracle database guy I’m going to install OUD under the “oracle” user. Make sure to have the the JDK set in your installation user’s environment.

vi ~/.bash_profile

export JAVA_HOME=/usr/java/jdk1.7.0_85
export PATH=${JAVA_HOME}/bin:${PATH}

 
Install OUD

Create the response file:

vi /tmp/silent_oud.rsp

[ENGINE]
Response File Version=1.0.0.0.0

[GENERIC]
SPECIFY_DOWNLOAD_LOCATION=false
SKIP_SOFTWARE_UPDATES=true
SOFTWARE_UPDATES_DOWNLOAD_LOCATION=
# where the OUD software will be installed
ORACLE_HOME=/u01/app/oracle/product/mdlw11119/oud11123
MIDDLEWARE_HOME=/u01/app/oracle/product/mdlw11119
CONFIG_WIZARD_RESPONSE_FILE_LOCATION=0

[SYSTEM]
[APPLICATIONS]
[RELATIONSHIPS]

Feed the response file to the OUD installer:

mkdir /tmp/tmpoud
unzip V75929-01.zip -d /tmp/tmpoud

cd /tmp/tmpoud
./Disk1/runInstaller -silent \
  -responseFile /tmp/silent_oud.rsp \
  -jreLoc /usr/java/jdk1.7.0_85

rm -rf /tmp/tmpoud

Done. OUD software is installed on your server.
 
Patch OUD

As mentioned in the previous blog post we need to patch OUD for Oracle 12c “eusm” utility to be able to connect.

export ORACLE_HOME=/u01/app/oracle/product/mdlw11119/oud11123
export PATH=${ORACLE_HOME}/OPatch:${PATH}

mkdir /tmp/oudpatch
unzip p20529805_111230_Generic.zip -d /tmp/oudpatch

# if patching a running OUD we need to stop it for patching
# cd /u01/app/oracle/product/mdlw11119/asinst_1/OUD/bin
# ./stop-ds

cd /tmp/oudpatch/20529805
opatch apply

rm -r /tmp/oudpatch/

 
Configure OUD

By default, the instance created is MW_HOME/asinst_1. By exporting following variable before calling oud-setup the instance name can be set:
# export INSTANCE_NAME=;

cd /u01/app/oracle/product/mdlw11119/oud11123

# we write the password of the directory root user into a file
#   unfortunately, that's how the OUD tools work
#   personally, I think this is one of the worst command line tool design
_PWFILE_ADM_=/tmp/pwfile-adm.txt
echo "Complex-1-Password" > ${_PWFILE_ADM_}

# create the OUD instance with default name asinst_1;
./oud-setup --cli \
  --baseDN dc=spotonoracle,dc=com \
  --addBaseEntry \
  --integration eus \
  --ldapPort 1389 \
  --adminConnectorPort 4444 \
  --rootUserDN cn=diradmin \
  --rootUserPasswordFile ${_PWFILE_ADM_} \
  --enableStartTLS \
  --ldapsPort 1636 \
  --generateSelfSignedCertificate \
  --hostname $(hostname) \
  --no-prompt --noPropertiesFile

# delete the password file
rm ${_PWFILE_ADM_}

Check the status of the OUD instance.

/u01/app/oracle/product/mdlw11119/asinst_1/OUD/bin/status

 
Why exactly did we patch?

By default OUD only supports irreversible hashing algorithms for the root user password policy. The patch allows us to configure AES as an additional method.

_PWFILE_ADM_=/tmp/pwfile-adm.txt
echo "Complex-1-Password" > ${_PWFILE_ADM_}

cd /u01/app/oracle/product/mdlw11119/asinst_1/OUD/bin

# check what's currently configured
./dsconfig -h $(hostname) -p 4444 -D "cn=diradmin" \
  --bindPasswordFile ${_PWFILE_ADM_} \
  get-password-policy-prop --policy-name "Root Password Policy" \
  --no-prompt \
  --trustAll
# shoud be SHA-512

# add AES as additional algorithm
./dsconfig -h $(hostname) -p 4444 -D "cn=diradmin" \
  --bindPasswordFile ${_PWFILE_ADM_} \
  set-password-policy-prop --policy-name "Root Password Policy" \
    --add default-password-storage-scheme:AES \
  --no-prompt \
  --trustAll

# always delete the password file
rm ${_PWFILE_ADM_}

As it happens the password was hashed using SHA-512 during the installation. We must change the password in order to make OUD hashing the password using the AES algorithm. Let’s change the password back and forth.

cd /u01/app/oracle/product/mdlw11119/asinst_1/OUD/bin
_PWFILE_ADM_=/tmp/pwfile-adm.txt

# change the password to some temporary value
echo "Complex-1-Password" > ${_PWFILE_ADM_}
./ldappasswordmodify -h $(hostname) -p 4444 -D "cn=diradmin" \
  -j ${_PWFILE_ADM_} \
  --useSSL \
  --trustAll \
  -c Complex-1-Password \
  -n Temp-1-Password

# change it back to the original value
echo "Temp-1-Password" > ${_PWFILE_ADM_}
./ldappasswordmodify -h $(hostname) -p 4444 -D "cn=diradmin" \
  -j ${_PWFILE_ADM_} \
  --useSSL \
  --trustAll \
  -c Temp-1-Password \
  -n Complex-1-Password

# verify that AES was used as well as SHA-512
echo "Complex-1-Passowrd" > ${_PWFILE_ADM_}
./ldapsearch -h $(hostname) -p 4444 -D "cn=diradmin" \
  --useSSL \
  --trustAll \
  -j ${_PWFILE_ADM_} \
  -b "cn=Directory Manager,cn=Root DNs,cn=config" \
  -s base objectclass=* userpassword
# should show 2 lines output: one with SHA-512, one with AES

# never forget to delete the password file
rm ${_PWFILE_ADM_}

 
Your OUD instance is ready for use with Enterpise User Security.
Next, I’m going to show how to install ODSM so you easily browse and configure the directory in your web browser.

Start and stop the OUD service

cd /u01/app/oracle/product/mdlw11119/asinst_1/OUD/bin

# start OUD
./start-ds

# stop OUD
./stop-ds

Enterprise User Security – Part 1

After having the pleasure to work with EUS there is no going back. I like EUS so much it makes me wonder why the adoption of this feature is so small. Maybe because it’s such a huge PITA to install and setup (just kidding, I know the licenses cost some a bag full of money. Moreover, most organization don’t seem to care enough about their total mess in identity and access management).

What I’m going to show in this series is what is necessary to make EUS happen on the currently latest version of OUD (11.1.2.3) and the Oracle database (12.1.0.2). As usual, there is some patching and working around to do.

But, first things first. What software do we need and what is each component for?

Oracle Unified Directory
OUD is the directory service to which the database is making requests about users, credentials and privileges (roles). OUD is a LDAP directory based on OpenDS. It’s a pure Java application with a integrated Berkley DB backend.

Oracle Directory Services Manager
This component is optional but will make your life so much easier. ODSM is a web-based GUI to manage OUD. You use it to configure OUD, setup replication between multiple OUD’s and manage your users, groups, etc. ODSM is an application deployed on Weblogic and is using ADF.

Download Software
Java JDK: Version 7 (latest Update)
– download from support.oracle.com / Patch 1307984

Weblogic Server 11gR1 (Generic and Coherence): Version 10.3.6
– download from edelivery.oracle.com / Part-No.: V29856-01

Oracle Application Development Framework (ADF): Version 11.1.1.9.0
– download from support.oracle.com (Patch 20996481 / p20996481_111190_Generic.zip)

Oracle Unified Directory (OUD): Version 11.1.2.3.0
– download from edelivery.oracle.com / Part-No.: V75929-01

Required Patches
As I said before, there are some patches required for everything playing nice together.

Database 12.1.0.2 requires patch to support SHA-2 with SSL:
– p19285025_121020_Linux-x86-64.zip
– get latest OPatch (6880880) for your database home version as per patch note

OUD 11.1.2.3 requires patch to allow EUSM tool to connect:
– p20529805_111230_Generic.zip
– your current opatch version in the MW home should be high enough (OPatch version 11.1.0.11.0) to apply this patch

Happy downloading…


Wrap your head around EUS
Meanwhile, let’s quickly look at what it’s all about – in case you’re new to this EUS business. The following diagram is an attempt to put everything in one picture what is scattered in the documentation: Database Enterprise User Security Administrator’s Guide.

eus-relationship

Coloring scheme:
– Green: objects in the database
– Blue: groups of objects in the LDAP directory
– Red: user entities in the LDAP directory
– Yellow: enterprise roles in the LDAP directory

There’s a group of users and each user is a member of one or more (functional) groups. The “Users” group is mapped to a database schema EUS_USER. This means every database login from one of these users will physically connect to the EUS_USER schema in the databases. Every functional group is granted one or more enterprise roles. Each enterprise role is mapped to a role in one or more databases.

What’s next
I’m going to show you how to install and configure all the components so you can start registering databases for EUS. And, we’re going to do this in silent mode – meaning it’s all command line and response files instead of OUI screen shots.